
We have shown that there are 12 Tetrahelix passing through a single Tetrahedron.
Here is an interactive web page that lets you explore and see how these 12 Tetrahelix pass through the single Tetrahedron.
NOTE: The ends of the 12 Tetrahelix do not define a truncated Octahedron. It looks like a truncated Ocathedron, but the edge lengths of the surrounding polyhedron (when connecting the 12 vertices of the Tetrahelix axes end points) are not all of the same length. The edge lengths are in the ratios (approximately) 3.9:4.1:4.3. This is why the surrounding polyhedron, when displayed, has 3 different edge colors. (Recall that the axes of the 12 Tetrahelix do not pass through the center of volume of the initial Tetrahedron. This is one reason for having a "Me Ball" defined at the center of volume, so this can be seen.)
The controls to the interactive web page assumes a 3-button mouse.
The left button will rotate the scene displayed (the Tetrahelix).
The center button or wheel will zoom the scene in and out.
The right mouse button will drag the scene with the mouse.
I am not familar with Apple computer, so I do not know what the equivalent mouse functions will be.
I will now walk you through using the Tetrahelix interactive web page
When you go to the web page, it is blank with a column of buttons on the left. These buttons turn the display of various Tetrahelix and other objects in the scene "on" and "off". All objects start with their display mode "off". Clicking on one of the buttons will toggle the object on or off if it is currently being displayed.
The first button is the "Me Ball". It displays (or hides) a simple sphere. It can help to visualize the center of the single Tetrahedron through which all 12 of the Tetrahelix pass.

The next 3 buttons, "Axes: 3 CW", "Axes: 3 CCW", and "Axes: 6 Others", are used to display the 12 axis associated with the 12 Tetrahelex. (This will make more sense in a minute.) "CW" means "Clockwise" and "CCW" means "Counter Clcokwise". These are refering to the spiral handedness of the Tetrahelix.

The next button "Center Tetrahedron" is to toggle the display of the central Tetrahedron. This is the Tetrahedron through which all 12 Tetrahelix are to pass. Note that the "base" or bottom triangle of the Tetrahedron is dark blue, while the remainder of the tetrahedron is light blue. This provides an orientation to the Tetrahedron. And, importantly, identifies the face (the dark blue face) that we imagine is placed on a table.

You will need to use the mouse buttons (left mouse button) to rotate the objects in the scene to look like the above figure, with the dark blue face on the "bottom", as if the Tetrahedron were placed on a table.
We then conceptually group the 12 Tetrahelix into 2 different groups: 1) Those 6 that pass through the base (dark blue) triangle of the Tetrahedron, and 2) The 6 remainning Tetrahelix that do not pass through the base triangle.
The "C.T. Faces" button toggles the 4 faces of the Tetrahedron to be solid.

All the Tetrahedra will have this option to display them with solid faces or open faces.
By using the mouse buttons, you can rotate this scene around and start to get a sense for how the Tetrahelix will be distributed around the Tetrahedron. Again, each axis line displayed represents a Tetrahelix passing through the Tetrahedron.
We will first explore only those Tetrahelix that pass through the bottom (dark blue) face of the Tetrahedron. We therefore turn off the display of the 6 axes for the Tetrahelix that do not pass through this face by clicking on the "Axes: 6 Others" button.
We see that there are 6 axes lines through the base face. These axes lines are divided into 2 axes lines for the remainning 3 faces of the Tetrahedron.
We next place a Tetrahedron on the "top" 3 faces of the Tetrahedron by clicking on the "1st Layer Top" button. This is the first layer of Tetrahedra covering the central Tetrahedron. The bottom face is not covered with a Tetrahedron, at this point, only so we can focus on the Tetrahelix passing through the bottom face of the Tetrahedron. This "missing" Tetrahedron for the bottom face can be added using the "1st Layer Bot." button further down the list of buttons.


We see that with this first layer of Tetrahedra around the center Tetrahedron, the axes lines are now such that there is one line per green Tetrahedron face.
Clicking on the "2nd Layer Top" button adds another layer of Tetrahedra for the "Top" part of the centeral Tetrahedron, above the "table top" that it is sitting on.


The "3rd Layer Top CW" button adds the remainder of the Tetrahelix having clockwise orientation, and the "3rd Layer Top CCW" button adds the counter clockwise Tetrahelix. What is added is only those parts of the Tetrahelix that are above the base/bottom face of the center Tetrahedron. (I've changed the orientation and zoomed out to get the following Figures.)

Rotating this model we can see the bottom dark blue face.

By clicking on the "1st Layer Bot.", "2nd Layer Bot", "3rd Layer Bot CW", and "3rd Layer Bot CCW" buttons, we can see how these Tetrahelix pass through the center Tetrahedron. The "Bot" refers to below the dark blue face.


These are the 6 Tetrahelix that pass through the center Tetrahedron and through the bottom face of the Tetrahedron.
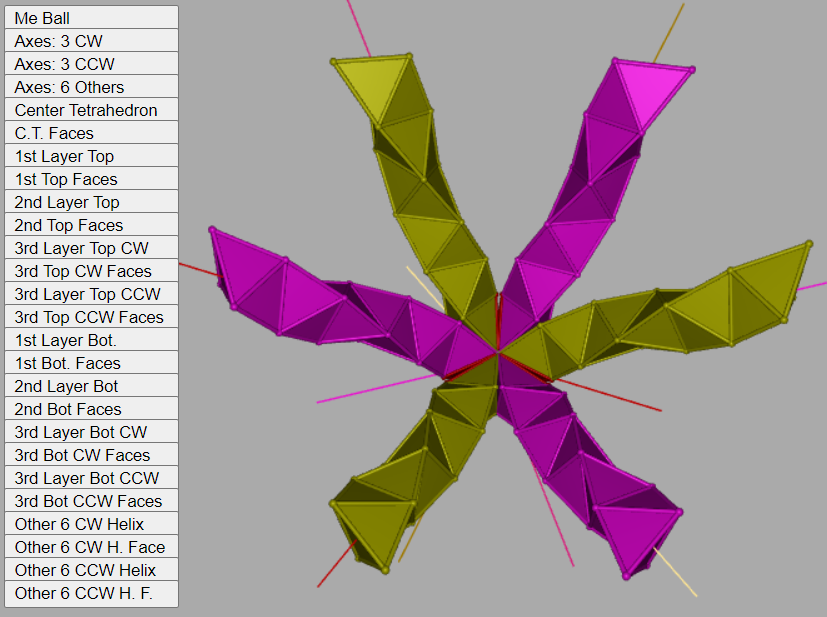
To display the remaining 6 Tetrahelix, click on the "Other 6 CW Helix", and "Other 6 CCW Helix" buttons.

The great thing about the interactive web page is that you can rotate and zoom in or out on the displayed objects to get a feel for how these all come together.
Usage Note: My work is copyrighted. You may use my work but you may not include my work, or parts of it, in any for-profit project without my consent.